Your Meta Ads dashboard says 63 purchases. Your Shopify backend says 42. Your Google Analytics says 38. Pick any two and they disagree. This is not a coincidence — it is what happens when browser-based tracking alone is trying to do a job that browsers are increasingly prevented from completing.
The Meta Pixel, which has been the foundation of Facebook and Instagram ad tracking since 2015, depends on JavaScript running in your visitor’s browser and cookies persisting between sessions. Both of those requirements are under sustained pressure from iOS privacy restrictions, Safari’s cookie limits, ad blockers, and consent regulations. The result is that Pixel-only accounts in 2026 are systematically missing 30–60% of their actual conversions.
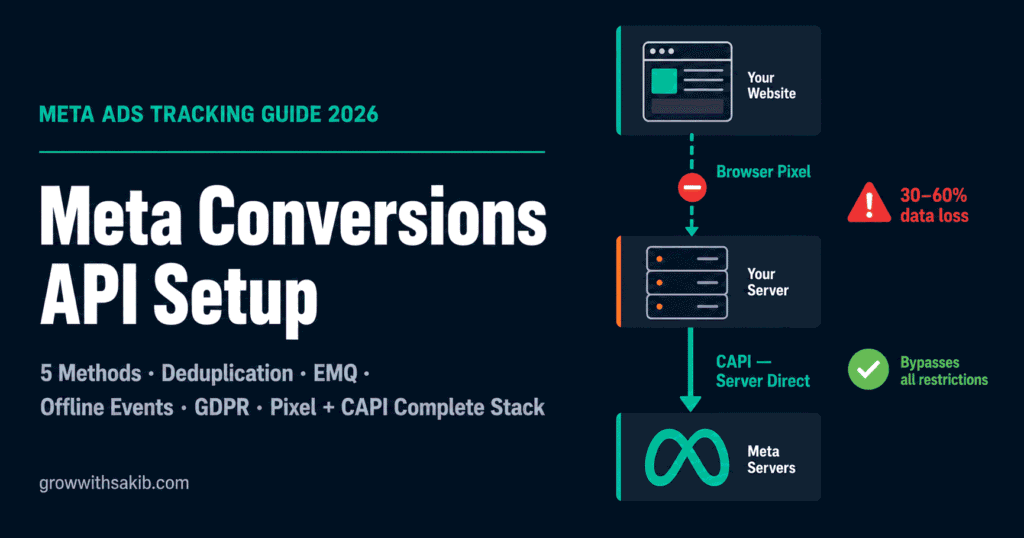
Meta Conversions API — CAPI — is the fix. It sends conversion data directly from your server to Meta, bypassing the browser entirely — and is a foundational component of the complete Meta Ads strategy. In April 2026, Meta made basic CAPI setup available with a single click at no cost. Industry-wide, still only 35–60% of active Meta advertisers have implemented it. If you are not in that group, this guide gets you there — correctly, with proper deduplication, optimised Event Match Quality, and GDPR compliance built in.
The Signal Loss Problem: Why Pixel-Only Tracking Is Now Broken
Understanding why CAPI matters requires understanding what is actually happening to your tracking data. It is not one problem — it is four separate problems that all happen to the same user simultaneously.
The four compounding data loss sources
- iOS App Tracking Transparency (ATT): Since iOS 14.5, every iPhone user sees a prompt asking whether to allow cross-app tracking. The opt-out rate exceeded initial projections. For iOS-heavy audiences — which is most audiences, given iPhone market share in the US, UK, and Australia — the Pixel lost a large share of its attribution capability when ATT rolled out, and has never recovered it.
- Safari Intelligent Tracking Prevention (ITP): Safari’s ITP blocks third-party cookies by default and caps first-party cookie lifetimes at 7 days. The Meta Pixel’s _fbp cookie — which identifies returning visitors and connects multi-session journeys — is subject to these restrictions. Users with longer consideration cycles become invisible between sessions.
- Ad blockers: 25–30% of web users run ad-blocking software. Many block the connect.facebook.net domain that the Meta Pixel script loads from. For these users, zero Pixel events fire — not degraded events, zero events. They are completely invisible to Pixel tracking.
- Meta’s own in-app browser: When users click your ad inside the Facebook or Instagram app, the in-app browser renders your page. JavaScript execution and cookie handling in in-app browsers are inconsistent — this is especially ironic because Meta’s own app is one of the environments that most reliably breaks Meta’s own tracking.
These forces stack. A visitor on Safari with an ad blocker on an iPhone is invisible to your Pixel from three separate directions simultaneously. Server-side tracking vendors consistently report that Pixel-only setups miss 50%+ of actual conversions in 2026. The algorithm that optimises your campaigns is making decisions based on half the available data — and the half it is missing is not randomly distributed. Businesses that also invest in SEO for small business are less exposed to this single-channel tracking risk. High-converting iOS users are overrepresented in what gets lost.
What Is Meta Conversions API (CAPI)?
Meta Conversions API is a server-to-server interface. Instead of your visitor’s browser sending conversion data to Meta, your web server sends it directly — in an API call that bypasses every browser-side limitation.
A user takes an action on your site. Your server captures the event, attaches hashed customer identifiers (email, phone, click ID), and sends an API call to Meta’s Graph API endpoint. Meta receives the event, matches it to a user profile using those identifiers, and uses it for attribution and campaign optimisation.
The critical distinction: the Pixel depends on the visitor’s browser cooperating. CAPI depends on your server. Ad blockers do not block server-to-server API calls. Safari ITP does not apply to data sent from your server. iOS ATT restrictions do not affect events that never enter the browser environment.
CAPI vs Pixel: the comparison that matters
- Dimension: Data path – Meta Pixel (Browser): JavaScript → visitor’s browser → Meta – Meta Conversions API (Server): Your server → Meta’s API endpoint – Practical Implication: CAPI bypasses every browser-side restriction
- Dimension: iOS ATT restrictions – Meta Pixel (Browser): Directly impacted — opt-outs block attribution – Meta Conversions API (Server): Not affected — server call bypasses ATT – Practical Implication: CAPI recovers iOS conversions the Pixel cannot see
- Dimension: Safari ITP – Meta Pixel (Browser): Cookie lifetime capped at 7 days – Meta Conversions API (Server): Not affected — no cookies involved – Practical Implication: CAPI maintains multi-session tracking beyond ITP window
- Dimension: Ad blockers – Meta Pixel (Browser): Blocked if user runs an ad blocker – Meta Conversions API (Server): Not blocked — no browser script involved – Practical Implication: CAPI recovers 25–30% of users invisible to the Pixel
- Dimension: Setup complexity – Meta Pixel (Browser): Single JavaScript tag — low – Meta Conversions API (Server): Varies by method — from 0-click to developer-required – Practical Implication: One-click CAPI (April 2026) closed much of this gap
- Dimension: Offline events – Meta Pixel (Browser): Cannot track in-store or CRM events – Meta Conversions API (Server): Supports offline events from any source – Practical Implication: CAPI enables full-funnel attribution incl. CRM and in-store
- Dimension: Best used for – Meta Pixel (Browser): Real-time page events, micro-interactions – Meta Conversions API (Server): Conversion events, high-value actions, offline data – Practical Implication: Meta recommends running both together
Meta recommends running both Meta Pixel and CAPI simultaneously — not one or the other. The Pixel catches real-time micro-interactions your server might miss. CAPI catches conversions the Pixel misses due to browser restrictions. Together they form a complete tracking picture — provided you implement event deduplication to prevent double-counting (covered in Section 7).
What Changed in 2026: The Updates That Make CAPI More Urgent and Easier
- Date: May 14, 2025 – Change: Meta retired the legacy Offline Conversions API – Impact on Tracking: Any businesses using the old offline API need to migrate to CAPI (Datasets) immediately — legacy API no longer accepts data
- Date: September 15, 2025 – Change: iOS 26 / Safari 26 introduced Link Tracking Protection (LTP) – Impact on Tracking: Strips fbclid from links opened outside Private Browsing via Mail and Messages — a key CAPI identifier is lost for this traffic segment
- Date: January 12, 2026 – Change: Meta retired 7-day-view and 28-day-view attribution windows – Impact on Tracking: Longer-cycle B2B conversions become unattributable without CRM offline events sent via CAPI
- Date: February 2026 – Change: Dresden Higher Regional Court: €1,500/user GDPR damages for unlawful Pixel/CAPI use – Impact on Tracking: EU compliance is now a financial risk, not just a theoretical one — consent architecture is mandatory
- Date: April 15, 2026 – Change: Meta launched one-click CAPI in Events Manager (free, no developer required) – Impact on Tracking: The primary adoption barrier for SMBs — complexity — is largely removed for standard web events
- Date: April 2026 – Change: Meta reported 17.8% average cost-per-result improvement for CAPI accounts – Impact on Tracking: Official performance data from Meta quantifies the business case for implementation
The Five CAPI Implementation Methods: How to Choose Yours
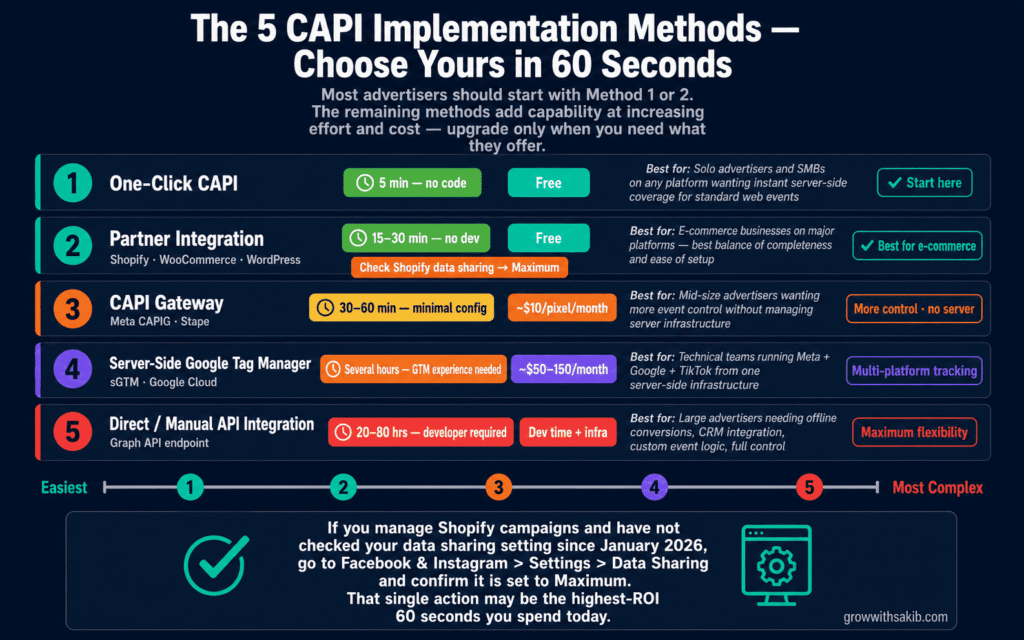
There is no single right way to set up CAPI. Five distinct methods exist, ranging from completely automated to fully custom. The right choice depends on your platform, your team’s technical capabilities, your budget, and what events you need to track. Here is each method with its full profile.
Method 1: One-Click CAPI (The April 2026 Option)
In April 2026, Meta released a one-click CAPI setup inside Events Manager. This is a zero-configuration option where Meta handles all the infrastructure. No server, no code, no cost.
- Who it’s for: SMBs, solo media buyers, and any advertiser who could not previously justify the technical overhead of CAPI.
- What it covers: Standard web events — PageView, ViewContent, AddToCart, InitiateCheckout, Purchase, Lead. The events your Pixel already fires.
- What it doesn’t cover: Custom events, offline conversions, CRM events, multi-platform event routing, or anything requiring custom data transformation.
- How to activate: Events Manager → your Pixel → Overview tab → ‘Activate Conversions API’ button. Done.
- Cost: Free.
Method 2: Partner Integration (Shopify, WooCommerce, WordPress, Squarespace)
Native platform integrations handle server-side event transmission automatically. For Shopify, this is a single toggle in the Facebook & Instagram sales channel settings. For WooCommerce, the Meta for WordPress plugin or PixelYourSite handles it. For other platforms, similar native or plugin-based integrations exist.
- Who it’s for: E-commerce businesses on major platforms who want complete standard event coverage without developer involvement.
- What it covers: All standard e-commerce events (Purchase, AddToCart, ViewContent, etc.) with platform-native parameters. Better event parameter completeness than one-click CAPI.
- What it doesn’t cover: Custom event parameters beyond platform defaults, offline events, cross-platform routing.
- Shopify-specific note: In January 2026, Shopify changed its default data sharing from ‘Always on’ to ‘Optimised’ — a change that directly affected Meta Ads for local business campaigns where Shopify merchants rely on accurate purchase attribution for geo-targeted campaigns. If you set up your Shopify Meta integration before that date, go to Facebook & Instagram > Settings > Data Sharing and confirm it is set to ‘Maximum.’ This single setting change recovers significant event data.
- Cost: Free (included in platform integration).
Method 3: CAPI Gateway (Meta CAPIG)
The CAPI Gateway is a cloud-hosted solution — available through Meta directly or via third parties like Stape — that sits between your website and Meta’s servers. It acts as a relay: your Pixel sends events to the Gateway, which forwards them server-side to Meta. No server management required on your end.
- Who it’s for: Mid-size advertisers who want more control than partner integrations offer but do not want to manage their own server infrastructure.
- What it covers: Standard events plus configurable event transformations. You can control which events are forwarded and apply basic data manipulation.
- What it doesn’t cover: Full custom event logic, multi-platform routing, direct CRM integration without additional tools.
- Cost: Through Meta: free tier available. Through third-party hosts like Stape: approximately $10/pixel/month.
Method 4: Server-Side Google Tag Manager (sGTM)
A server-side GTM container — hosted in Google Cloud or another provider — routes events from your website to Meta and other ad platforms from a single setup. You install a GTM client-side container on your site, which sends events to your server-side container, which then distributes them to Meta, Google Ads, TikTok, and any other connected platforms.
- Who it’s for: Technical marketing teams already using GTM who need to track across multiple ad platforms from one infrastructure.
- What it covers: Full event control including custom events, cross-platform routing, first-party data enrichment, and advanced data transformations.
- What it doesn’t cover: Offline or CRM events without additional webhook configuration.
- Cost: Google Cloud hosting: approximately $50–$150/month depending on traffic volume. Additional GTM configuration time.
- Best practice: Host your sGTM container on a first-party subdomain (e.g., metrics.yourdomain.com) rather than Google’s default domain. This treats events as first-party data, which reduces ITP interference and improves cookie persistence.
Method 5: Direct / Manual API Integration
Your development team sends direct HTTP POST requests to Meta’s Graph API Conversions endpoint. You control every parameter: which events to send, when to send them, what data to include, and how to handle errors and retries. Maximum flexibility, maximum development effort.
- Who it’s for: Large advertisers with in-house development teams who need custom data flows — offline conversions, CRM-triggered events, multi-step attribution, or complex event logic that does not fit pre-built solutions.
- What it covers: Everything. Any event, any parameter, any timing, any data source.
- What it doesn’t cover: Nothing — this method has no inherent limitations beyond what Meta’s API supports.
- Cost: Development time (typically 20–80 hours for initial implementation). Infrastructure costs vary.
| Your Situation | Team | Budget | Recommended Method |
| Standard e-commerce, Shopify/WooCommerce | No dev team | Free | Partner Integration (Method 2) + confirm Maximum data sharing |
| New to CAPI, any platform, standard events only | Solo advertiser | Free | One-click CAPI (Method 1) |
| Need more control, no server management | Small team | ~$10/month | CAPI Gateway (Method 3) |
| Running Meta + Google + TikTok, technical team | GTM-experienced | ~$50–150/month | Server-side GTM (Method 4) |
| Offline events, CRM integration, custom logic | In-house developers | Dev time + infra | Direct API Integration (Method 5) |
Step-by-Step Setup: The Universal Foundation
Regardless of which method you choose, the first three steps are identical. Complete these before beginning method-specific setup.
01 Generate Your CAPI Access Token
Log into Meta Business Manager at business.facebook.com.
Navigate to Events Manager and select your Pixel from the data sources list.
Click the ‘Settings’ tab in the top navigation.
Scroll to the ‘Conversions API’ section and click ‘Generate Access Token.’
Copy the token immediately — this is the only time it will display. If you close the window without copying it, you will need to generate a new one.
Store the token in a secure password manager or encrypted document. Treat it like a password — anyone with this token can send events to your Pixel.
02 Confirm Your Pixel ID
In Events Manager, your Pixel ID is displayed below the Pixel name at the top of the overview page. It is a 15–16 digit number.
You will need both the Pixel ID and the Access Token for any CAPI method. Keep them together in a secure location.
If you manage multiple Pixels (for multiple businesses or websites), confirm you are using the correct Pixel ID for the domain you are setting up CAPI for. Pixel ID mismatches are a common source of CAPI issues.
03 Activate Domain Verification (If Not Already Done)
Domain verification is required for proper iOS tracking via AEM and is a prerequisite for some CAPI advanced features.
Go to Business Settings > Brand Safety > Domains. Add your root domain (yourdomain.com — no www) and complete the DNS TXT or HTML file verification.
If your domain is already verified, skip this step. If not, do this before activating CAPI. Verification can take up to 72 hours for DNS propagation.
Shopify-specific setup (Method 2)
- In Shopify Admin, go to your Facebook & Instagram sales channel.
- Navigate to Settings > Data Sharing.
- Critical: Set Data Sharing to ‘Maximum.’ As of January 2026, Shopify’s default changed from ‘Always on’ to ‘Optimised.’ If your integration was set up before this change, you may be sending significantly fewer events. Maximum data sharing enables both browser and server events with the richest available customer identifiers.
- Verify in Events Manager that key conversion events (Purchase, Lead) now show ‘Browser + Server’ under the source column. If you only see ‘Browser,’ CAPI is not active.
CAPI Gateway setup (Method 3)
- Log into your Meta Business Manager and go to Events Manager.
- Click ‘Connect Data Sources’ and select ‘Conversions API Gateway.’
- Choose your hosting option — Meta provides a free-tier option, or select a third-party host like Stape for more configuration control.
- Enter your Pixel ID when prompted. The Gateway will handle authentication automatically.
- Install the Gateway’s JavaScript snippet on your website — this replaces your standard Pixel code and routes events through the Gateway.
- In the Gateway admin interface, configure which events to forward and any data transformations you need.
- Test using Events Manager Test Events to confirm Browser + Server events are arriving.
sGTM setup overview (Method 4)
Server-side GTM setup has several components. This is an overview — full sGTM setup is a separate technical guide.
- Create a server-side GTM container in your existing GTM account (Container Type: Server).
- Deploy the container to Google Cloud Run or another compatible host.
- Point the server container to a first-party subdomain of your domain (e.g., metrics.yourdomain.com).
- Install a client-side GTM snippet that points to your server container URL instead of Google’s servers.
- Configure a Meta CAPI tag in your server container, entering your Pixel ID and Access Token.
- Set up event-forwarding rules that map your GA4 or custom events to Meta’s standard event names.
- Test using sGTM’s preview mode and Meta Events Manager Test Events simultaneously.
Event Deduplication: The Part Most CAPI Setups Get Wrong
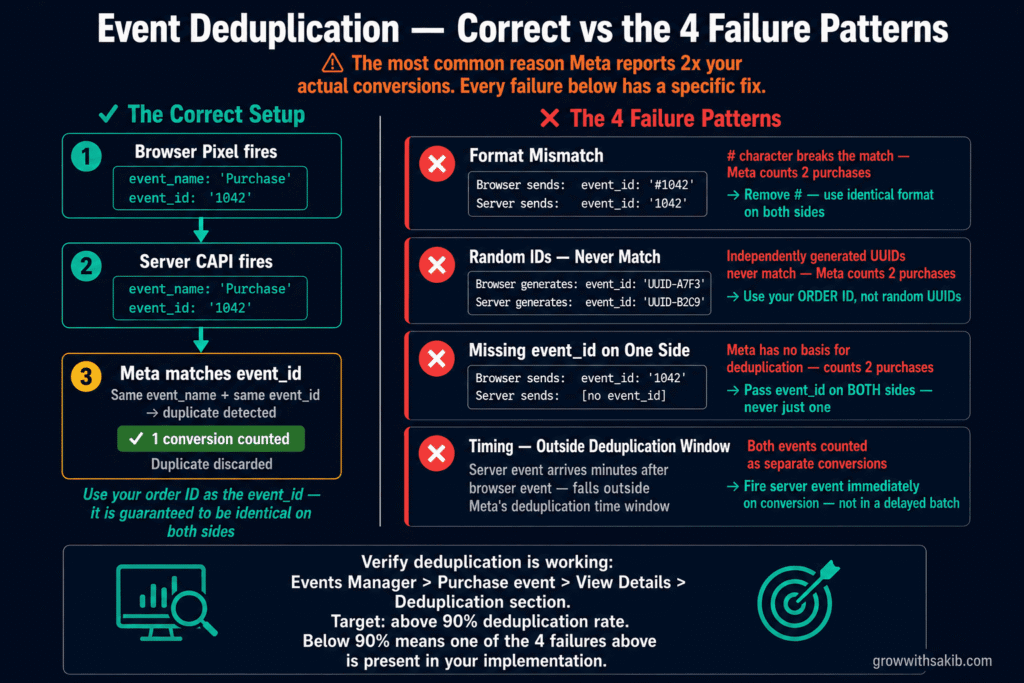
Running Pixel and CAPI simultaneously means Meta receives the same conversion event twice — once from the browser, once from your server. Without deduplication, Meta counts both as separate conversions. Your dashboard shows 60 purchases; you actually had 30. Your CPA looks healthy; it is inflated by a factor of two. Your bidding algorithm is optimising on fiction.
This is not a hypothetical problem. It is a systematic issue in CAPI setups that skip deduplication, and it is more common than it should be.
How deduplication works: the event_id mechanism
Meta deduplicates events using two fields: event_name and event_id. When Meta receives two events with the same event_name (e.g., ‘Purchase’) and the same event_id, it keeps one and discards the duplicate as long as they arrive within a short time window (typically a few minutes).
Deduplication match = same event_name + same event_id (within deduplication window)
The golden rule: use your order ID as the event_id
The most reliable event_id for a Purchase event is your order ID — or any transaction identifier that is guaranteed to be identical on both the browser and server side.
- Browser Pixel: Pass event_id: ‘1042’ (your order ID) in the Purchase event.
- Server CAPI: Pass event_id: ‘1042’ (the same order ID) in the Purchase event sent from your server.
- Result: Meta receives two Purchase events with event_name: ‘Purchase’ and event_id: ‘1042.’ It keeps one and discards the duplicate.
Verifying deduplication is working
- In Events Manager, click on a key event like ‘Purchase.’
- Click ‘View Details.’
- Look for the ‘Deduplication’ section — it shows what percentage of events were successfully deduplicated.
- Target: above 90% deduplication rate for events where both Pixel and CAPI fire.
- Sanity check: Compare your Meta-reported conversions against your actual orders. A healthy ratio is 0.95x–1.05x. Above 1.05x indicates duplication is occurring. Below 0.95x indicates tracking gaps.
Event Match Quality: The Metric That Determines Whether CAPI Actually Works
CAPI setup without EMQ optimisation is like installing a phone line but whispering into it. You have the infrastructure — but the data quality is too low for Meta to use it effectively.
Event Match Quality (EMQ) is Meta’s score from 0 to 10 measuring how well it can match your server-sent events to actual user profiles in its system. A score of 7.0 means roughly 70% of your CAPI events are successfully matched to a Meta user. The unmatched 30% contributes nothing to attribution or optimisation.
- Event Type: Purchase – Target EMQ Score: 8.8 – 9.3 / Why This Target: Highest-value event — deserves maximum identifier coverage / Typical Pixel-Only Score: 3.5 – 5.0
- Event Type: Lead – Target EMQ Score: 7.5 – 8.5 / Why This Target: Second-highest value — email is usually available at form submission / Typical Pixel-Only Score: 3.0 – 5.0
- Event Type: AddToCart – Target EMQ Score: 7.5 – 8.5 / Why This Target: Users may not be logged in — capture what you can / Typical Pixel-Only Score: 3.0 – 4.5
- Event Type: InitiateCheckout – Target EMQ Score: 8.0 – 8.8 / Why This Target: Email often available at checkout step — use it / Typical Pixel-Only Score: 3.0 – 5.0
- Event Type: ViewContent – Target EMQ Score: 6.5 – 7.5 / Why This Target: Anonymous event — fbp and fbclid are primary identifiers / Typical Pixel-Only Score: 3.0 – 4.0
- Event Type: PageView – Target EMQ Score: 6.0 – 7.0 / Why This Target: Broadest event — EMQ will naturally be lower / Typical Pixel-Only Score: 2.5 – 4.0
The identifiers that drive EMQ — ranked by impact
- Hashed email address (em): Single highest-impact identifier — can increase your EMQ score by up to 4 points. If users are logged in or have entered their email (at checkout, form submission, or login), capture and pass this with the event. Must be SHA-256 hashed in lowercase before transmission.
- Hashed phone number (ph): Second-highest impact. Pass in E.164 format (+447911123456), then SHA-256 hash. Include country code even for domestic numbers.
- fbclid (fbc): Meta’s click identifier from ad links. Present in the URL when a user clicks your ad (as ?fbclid=). Must be stored (typically in a cookie or session variable) and passed with server events. iOS 26 Link Tracking Protection strips this from some traffic — combine with email to compensate.
- fbp cookie: Meta’s first-party browser identifier. Set by the Pixel, must be read from the cookie and passed with CAPI events. Your server needs to read the _fbp cookie value and include it in the API payload.
- External ID (external_id): Your CRM or platform’s internal customer ID. Useful for returning customers and CRM integration. Any consistent unique identifier works.
- Additional identifiers: First name, last name, city, postcode, country, date of birth, gender. Lower individual impact but cumulatively meaningful. Pass all that are available.
Enable Automatic Advanced Matching — the fastest EMQ improvement
In Events Manager > your Pixel > Settings > Automatic Advanced Matching, toggle this on. When enabled, Meta automatically detects and hashes customer data entered into forms on your website — email addresses typed at checkout, for example — and includes them with browser Pixel events. This improves browser-side EMQ immediately, and the same data can be passed with your CAPI events.
This is the fastest way to improve EMQ without any code changes. Do it now if it is not already enabled — then return to the Meta Ads Guide to use your improved tracking stack for campaign setup.
Offline Events and CRM Integration: CAPI’s Most Underused Capability
Most CAPI guides cover website event tracking and stop there. But CAPI’s most powerful use case — particularly for B2B and service businesses — is offline conversion tracking: sending events from your CRM, call centre, or point-of-sale system back to Meta to complete the attribution loop.
Why offline events matter in 2026
Meta retired the legacy Offline Conversions API on May 14, 2025. Any business that used it for in-store or CRM event tracking needs to migrate to CAPI Datasets. The new system is more capable and integrates better with the rest of Meta’s advertising infrastructure.
The attribution problem offline events solve: a user clicks your ad, fills out a lead form, and becomes a paying customer three weeks later after two sales calls. The Pixel captured the lead but nothing after that. Meta’s algorithm thinks your campaign generates leads — it has no idea which leads become customers. With offline CRM events via CAPI, Meta sees the full story: ad click → lead → qualified opportunity → closed deal. The algorithm can then optimise for the pattern that predicts customers, not just form completions — the same principle that drives effective Meta Ads attribution strategy.
Setting up offline events / CRM CAPI
- Go to Events Manager and click ‘Connect Data Sources’ → ‘Offline’ → ‘Upload manually or via API.’
- Create a new Dataset (Meta’s replacement for the old Offline Conversions API). Give it a clear name like ‘CRM Deals – 2026.’
- Link the Dataset to your ad accounts in Business Settings to ensure events attribute to your campaigns.
- For each offline event, include these required fields:
- event_name: ‘Lead’, ‘Purchase’, or a standard event matching the CRM stage
- event_time: UTC timestamp of when the action occurred
- action_source: ‘system_generated’ for CRM events (or ‘physical_store’ for in-store)
- hashed identifiers: email and/or phone from the original lead record
- Critical: Include the fbclid click ID that was captured when the original lead submitted their form. Without it, Meta cannot link the CRM event back to the ad click. This must be stored in your CRM at lead creation time.
- For HubSpot: use the native CAPI integration that syncs lifecycle stage changes directly to Meta. For Salesforce, Pipedrive, and others: use third-party connectors (Datahash, LeadsBridge, CustomerLabs) or configure webhooks that fire when deal stages change.
GDPR and Privacy Compliance: What CAPI Does Not Bypass
This is the section most CAPI guides skip almost entirely. It is also the section where real legal risk lives.
CAPI bypasses browser-side tracking restrictions. It does not bypass consent requirements. Hashed or not, email addresses and phone numbers are personal data under GDPR, CCPA, and equivalent regulations. You need a lawful basis — typically explicit user consent — before sending that data to Meta.
Building compliant CAPI
- Implement a Consent Management Platform (CMP): Cookiebot, OneTrust, CookieYes, and similar CMPs can be configured to block CAPI events until the user consents. This must be implemented at the server level — your server event trigger should check consent status before firing.
- Your server-side consent check: The Pixel’s CMP integration handles browser-side consent. Server-side events need their own check. If your server receives a webhook when a user converts but you have not verified that user’s consent status, you may be sending personal data you are not authorised to send.
- US traffic (CCPA): For US users, use the Limited Data Use (LDU) flag in your CAPI payload when users from California opt out of data selling. This signals to Meta to restrict how the data is used.
- Data minimisation: Do not send identifiers you do not have consent to process. If a user has not consented to marketing, do not include their email in CAPI events even if you have it on file.
- Update your privacy policy: Your privacy policy must clearly explain that you use server-side tracking via Meta Conversions API, what data is transmitted, and how it is used. This is a GDPR transparency requirement.
Post-Setup Verification and Troubleshooting
The post-setup verification checklist
- Events Manager shows ‘Browser + Server’ for key events. Go to Events Manager > your Pixel > Overview. Key events like Purchase and Lead should show both Browser and Server sources. If you only see Browser, CAPI is not active.
- Deduplication rate is above 90%. Events Manager > Purchase event > View Details > Deduplication section. Below 90% means event_id is not matching correctly.
- EMQ scores are at or above targets. Events Manager > your Pixel > Event Match Quality. Purchase should be above 8.8. Lead above 7.5. Below target means identifiers are missing.
- Shopify data sharing is set to Maximum. Facebook & Instagram sales channel > Settings > Data Sharing. ‘Maximum’ should be selected.
- Test Events confirms live event receipt. Events Manager > Test Events > enter your URL > browse and convert. Events should appear in real time with both Browser and Server sources.
- Actual conversion count is within 5% of platform data. Compare your order management system to Meta-reported conversions. Above 1.05x ratio indicates deduplication issue. Below 0.95x indicates tracking gaps — the same cross-channel data verification discipline that applies when tracking SEO results alongside paid campaigns.
- Consent architecture extends to server-side events. If you have EU traffic, confirm your CMP’s consent signals are checked before server events fire — not just browser-side tags.
Common CAPI problems and fixes
| Problem | Likely Cause | Fix |
| Events Manager shows only Browser, no Server | CAPI not activated or access token not configured | Re-activate CAPI (one-click or method of choice). Re-generate access token and confirm it is correctly entered. |
| Deduplication rate below 90% | event_id format mismatch between Pixel and server | Ensure both sides use the same identifier in identical format (e.g., both send ‘1042’, not ‘#1042’ vs ‘1042’) |
| EMQ below 6.0 despite CAPI running | Key identifiers not being passed with events | Enable Automatic Advanced Matching. Ensure hashed email is passed with Purchase and Lead events. Check fbclid and fbp are captured and forwarded. |
| Purchase count 2x actual orders | Deduplication not configured — double-counting | Implement event_id in both Pixel and CAPI events using your order ID as the shared identifier |
| CAPI shows events but conversions still low | Identifiers present but not hashed correctly | All personal data must be SHA-256 hashed in lowercase before transmission. Verify your hashing implementation against Meta’s documentation. |
| No improvement in reported conversions after setup | Testing in logged-out browser / no real traffic yet | Use Events Manager Test Events for verification. Allow 48 hours of live traffic before evaluating conversion improvement. |
Frequently Asked Questions
Do I need a developer to set up Meta Conversions API?
In 2026, no — for standard web events on major platforms. Meta’s one-click CAPI (released April 2026) requires no technical knowledge and no server. Shopify’s native CAPI toggle requires no developer. The CAPI Gateway requires minimal configuration. You only need a developer for custom events, complex data transformations, CRM integration, or the direct manual API method. If you are a solo advertiser or small business, start with one-click CAPI or your platform’s native integration today.
What is the difference between Meta Pixel and Conversions API?
Meta Pixel is a JavaScript tag in your visitor’s browser — it tracks what users do on your site in real time but is blocked by ad blockers, limited by iOS restrictions, and constrained by Safari’s cookie policies. Meta Conversions API is a server-to-server connection — your server sends event data directly to Meta, bypassing every browser-side restriction. They are complementary, not alternatives. Meta recommends running both simultaneously: the Pixel for real-time micro-interactions, CAPI for reliable conversion attribution. Running both with proper deduplication gives you complete coverage.
Will Meta CAPI double-count my conversions?
Only if you do not implement event deduplication. When running both Pixel and CAPI, Meta will receive each conversion event twice — once from the browser, once from the server. Without deduplication, both count as separate conversions. The fix is passing an event_id (typically your order ID) with both events. When Meta receives two events with the same event_name and event_id, it keeps one and discards the duplicate. This is covered in detail in the deduplication section above.
How long does it take to see results after setting up CAPI?
Attribution improvements typically appear within 24–48 hours. You will see more events appearing in Events Manager as previously invisible conversions start arriving. Campaign optimisation improvements take longer — Meta’s algorithm needs to accumulate sufficient data from the improved signal before it can meaningfully adjust audience targeting and bidding. Most accounts see measurable CPA improvement within 2–4 weeks as the algorithm learns from the richer data.
Is Meta Conversions API GDPR compliant?
Meta’s CAPI infrastructure can be implemented in a GDPR-compliant way, but compliance depends on how you implement it — not on the tool itself. You still need a lawful basis (typically user consent) to collect and transmit personal data (email addresses, phone numbers) to Meta. The February 2026 Dresden court ruling awarded €1,500 per affected user for CAPI implementation without proper consent. If you have EU traffic, implement a Consent Management Platform that extends consent signals to your server-side events, not just your browser-side Pixel.
What happened to the old Offline Conversions API?
Meta retired the legacy Offline Conversions API on May 14, 2025. If you were using it to send in-store or CRM events, that data is no longer being processed. You need to migrate to CAPI Datasets — the replacement system within Events Manager. The functionality is equivalent and has additional capabilities, but requires reconfiguration. In Events Manager, create a new Dataset under ‘Connect Data Sources’ > ‘Offline’ and reconnect your offline data sources.
What is a good Event Match Quality score?
Meta labels scores as Poor (under 4), OK (4–5.9), Good (6–7.9), and Great (8+). For Purchase events, target 8.8–9.3. For Lead events, target 7.5–8.5. For page-level events like ViewContent, 6.5–7.5 is normal given limited identifier availability. The most impactful single improvement is including hashed email addresses with conversion events — this alone can increase your EMQ by up to 4 points. Enable Automatic Advanced Matching in Events Manager settings to start capturing email from forms automatically.