Your Meta ads dashboard says 47 conversions today. Your Shopify backend says 22. Welcome to 2026 Meta Pixel tracking — where the gap between what the platform reports and what actually happened can be wide enough to make profitable campaigns look unprofitable, and broken ones look fine.
The Meta Pixel has not fundamentally changed — it is still a small piece of JavaScript you install on your website to feed data to Meta’s advertising system. What has changed is everything around it. Privacy updates, iOS restrictions, browser defences, and Meta’s own platform changes have turned basic pixel-only tracking into a leaky bucket. The advertisers still running Pixel alone are missing 30–60% of their conversion data and optimising on a fraction of what they should know.
This guide gives you the complete picture — and sits within the Meta Ads complete playbook covering every component of a full Facebook and Instagram advertising strategy. By the end, you will have a tracking stack that Meta’s algorithm can actually learn from.
What Changed in 2025–2026 (And Why Your Current Setup May Be Broken)
Before walking through setup, you need to understand what shifted in the last twelve months. If you set up your Pixel in 2023 or 2024 and haven’t touched it since, several platform changes may have quietly broken your tracking.
| Date | What Changed | Impact on Your Tracking |
| September 2025 | iOS 26 and Safari 26 introduced Advanced Fingerprinting Protection (AFP), stripping click IDs from links opened via Mail and Messages | Traffic from email links arrives without fbclid — click attribution breaks for this segment |
| January 12, 2026 | Meta retired 7-day-view and 28-day-view attribution windows | If you hadn’t updated settings, reported conversions dropped 15–40% overnight with no explanation in the UI |
| January 13, 2026 | Shopify changed its Meta channel default from ‘Always on’ to ‘Optimised’ data sharing | Fewer events sent to Meta; algorithm weighs low-signal pixels less heavily in optimisation |
| April 15, 2026 | Meta launched one-click Conversions API activation and AI event enrichment | CAPI is now easier to set up than ever — there is no excuse for Pixel-only tracking in 2026 |
The practical implication: if your ads felt like they stopped learning around January 2026, or your Shopify-to-Meta conversion numbers drifted apart in early 2026, these platform changes are likely the explanation — not a problem with your campaigns. Businesses investing in both paid and organic SEO are less exposed to single-platform tracking disruptions.
What the Meta Pixel Actually Does (And Why It Cannot Do It Alone)
Meta Pixel is a JavaScript snippet you place in the <head> of every page on your website. When a visitor lands on your site, the Pixel fires a PageView event. As they move through your site — viewing products, adding to cart, completing a purchase — additional events fire, sending that data to Meta’s servers.
Meta uses this data for three things: measuring which campaigns drove real business outcomes (conversion tracking), building audiences of people who took specific actions on your site (retargeting and lookalikes), and giving its algorithm the signals it needs to find more people likely to convert (optimisation).
The problem is the browser chain that carries this data has become increasingly unreliable.
Where 30–60% of Your Conversions Leak
- Safari Intelligent Tracking Prevention (ITP). Safari automatically caps JavaScript-set cookies — including the _fbp cookie that identifies your visitor — at 7 days. For businesses with longer sales cycles, this means losing attribution before users are ready to buy.
- iOS 26 Advanced Fingerprinting Protection. As of September 2025, Safari on iOS 26 strips the fbclid parameter from links opened through Mail and Messages. Clicks from email campaigns arrive without a click identifier — Meta cannot link them to an ad.
- Ad blockers. Between 25–30% of web users run an ad blocker. Most block the connect.facebook.net domain entirely, which prevents the Pixel script from loading. Zero events fire for this segment.
- In-app browsers. When users tap your ad inside the Facebook or Instagram app, the in-app browser renders your page. JavaScript execution is inconsistent in these environments and cookies behave differently — ironically, Meta’s own app is one of the biggest sources of Pixel data loss.
None of these are bugs you can fix. They are structural limitations of browser-side tracking. The solution is Conversions API — a server-side data channel that bypasses every one of these limitations. In 2026, Pixel + CAPI is not a best practice. It is the minimum standard.
Step 1: Create Your Meta Pixel in Events Manager
Before you can install anything, you need to create a Pixel in your Meta Business Manager. The Pixel itself lives in Events Manager, which you access through your Business Manager account.
01 Navigate to Events Manager
Log into your Meta Business Manager at business.facebook.com — if you haven’t set it up yet, see the complete setup guide first.
In the left sidebar, click ‘Events Manager’. If you don’t see it, go to All Tools > Events Manager.
Click the green ‘+ Connect Data Sources’ button.
Select ‘Web’ as your data source type.
When asked for your connection method, choose ‘Meta Pixel’.
02 Name Your Pixel and Enter Your Website URL
Give your Pixel a clear, descriptive name — ‘Business Name Website Pixel’ works well.
Enter your website URL. Meta will use this to check for compatible partner integrations and suggest the fastest installation path.
Click ‘Continue’.
You will be taken to the installation options screen. Don’t close this — you’ll need it for the next section.
03 Note Your Pixel ID
After creation, your Pixel is assigned a unique 15–16 digit Pixel ID.
You’ll need this ID for manual installation and for connecting partner integrations.
Find it in Events Manager under your Pixel name — it’s displayed below the Pixel name at the top of the overview.
Step 2: Install the Pixel on Your Website
Meta offers three installation paths. Choose based on your platform and technical setup — the end result is identical.
Installation Method 1: Partner Integration (Shopify, WooCommerce, Squarespace, Wix)
Partner integrations are the fastest path and handle most of the configuration automatically. For Shopify, the setup is a single connection — but with a critical setting to check in 2026.
Shopify Installation
- In Shopify Admin, go to Marketing > Facebook & Instagram (or search ‘Meta’ in the App Store).
- Click ‘Add Sales Channel’ and follow the connection wizard.
- When connecting your Business Manager, select the correct Business Manager, ad account, and Pixel.
- CRITICAL — Check your data sharing level. Go to Facebook & Instagram > Settings > Data Sharing in Shopify. You will see three options: Standard, Enhanced, and Maximum. As of January 13, 2026, Shopify changed the default to ‘Optimised’ (equivalent to Standard). If you set this up before that date and haven’t checked since, you may now be sending significantly fewer events to Meta. Set this to Maximum for the most complete tracking.
- Verify the connection by going to Events Manager and checking that PageView events are arriving from your domain.
WooCommerce / WordPress Installation
The official Meta for WordPress plugin (available at WordPress.org) handles base Pixel installation automatically. For more advanced event tracking and better Event Match Quality, consider PixelYourSite, which gives granular control over which events fire and what parameters accompany them.
- Install and activate the Meta for WordPress plugin (or PixelYourSite).
- Enter your Pixel ID in the plugin settings.
- Configure which standard events to track — at minimum: ViewContent, AddToCart, InitiateCheckout, Purchase.
- Enable automatic advanced matching if available — this passes hashed customer data (email, phone) with events, improving match quality.
- Verify using Pixel Helper (covered in Step 3).
Other Platforms
| Platform | Integration Path | Notes |
| Squarespace | Built-in under Settings > Marketing > Facebook Pixel | Limited to basic events; consider GTM for advanced tracking |
| Wix | Built-in under Marketing & SEO > Facebook Pixel | Straightforward setup; similar limitations to Squarespace |
| BigCommerce | App Marketplace — official Meta channel | Supports standard e-commerce events natively |
| Webflow | Custom code embed in Project Settings > Custom Code | Manual paste of base code; events require additional code |
| Magento | Meta Business Extension from Marketplace | Enterprise-grade; supports catalogue and DPA setup |
Installation Method 2: Google Tag Manager (GTM)
GTM is ideal if you already manage tags through a container, if you need to install on multiple subdomains, or if you want flexibility to update events without touching your site code. It is also the best choice if you want to add Conversions API later via a server-side GTM container.
- In your GTM workspace, click ‘New Tag’.
- For Tag Type, search for ‘Meta Pixel’ in the Community Template Gallery and select the official template.
- Enter your Pixel ID.
- For the Triggering, select ‘All Pages’ so PageView fires on every page load.
- For additional conversion events (Purchase, Lead, etc.), create separate tags that fire on specific triggers — for example, a trigger based on the Thank You page URL, or a custom event from your data layer.
- Use GTM Preview mode to verify tags fire correctly before publishing.
- Publish your container.
Installation Method 3: Manual Code Installation
Manual installation gives maximum control and requires adding the Pixel base code directly to your website’s HTML. Use this when you don’t have a platform integration available, or when you need fine-grained control over event parameters.
The base code goes in the <head> section of every page. It loads Meta’s JavaScript library, initialises your Pixel ID, and automatically fires a PageView event on each page load. You then add event code to specific pages or triggered by specific user actions — for example, a Purchase event on your order confirmation page, or an AddToCart event triggered by clicking your add-to-cart button.
Step 3: Configure Standard Events
The base Pixel installation automatically tracks PageView. Every other meaningful action requires you to configure standard events. Use these — not custom events — wherever your conversion actions map to them. Meta’s algorithm understands standard events natively and can optimise for them more effectively than custom event names.
| Event | What It Tracks | Key Parameters to Pass | Priority |
| PageView | Every page load (fires automatically) | None required | Base — always firing |
| ViewContent | Product or content page viewed | content_ids, content_type, value, currency | High |
| AddToCart | Item added to cart | content_ids, content_type, value, currency | High |
| InitiateCheckout | Checkout process started | content_ids, value, currency, num_items | High |
| Purchase | Transaction completed | value, currency, content_ids, content_type | Critical |
| Lead | Lead form submitted | content_name, value, currency | Critical (service businesses) |
| CompleteRegistration | Account or signup completed | content_name, value | Medium |
| Search | Search performed on site | search_string, content_ids | Medium |
| Contact | Contact form, phone click, chat initiated | None required | Low–Medium |
| Subscribe | Newsletter or subscription signup | value, currency, predicted_ltv | Medium |
Why Parameters Matter as Much as the Events Themselves
An event without parameters is a blunt signal. A Purchase event with value, currency, and content_ids tells Meta exactly what was bought, for how much, and by whom. This difference directly affects how well Meta can optimise your campaigns, build lookalike audiences, and attribute conversions.
For every Purchase event, always pass: value (the order total), currency (in ISO format — GBP, USD, EUR), and content_ids (an array of product identifiers that match your product catalogue) — essential for Meta Ads for e-commerce campaigns where dynamic product ads rely on catalogue matching. Missing these parameters limits dynamic product ads, value-based lookalikes, and purchase-value optimisation.
Step 4: Verify Your Pixel Is Working
Never assume a Pixel is working because you installed it. Verification takes five minutes and prevents weeks of running campaigns on bad data.
Tool 1: Meta Pixel Helper (Chrome Extension)
Install the Meta Pixel Helper extension from the Chrome Web Store. With it installed, visit your website and open the extension. You will see:
- Green checkmarks — events firing correctly with proper parameters
- Yellow warnings — events firing but missing recommended parameters
- Red errors — events firing with incorrect data or the Pixel not loading at all
Check your home page (PageView), a product page (ViewContent), the cart (AddToCart), and your order confirmation page (Purchase). All four should show green. Yellow warnings on parameter completeness are a signal to revisit your event configuration — they directly affect Event Match Quality.
Tool 2: Events Manager Test Events
In Events Manager, navigate to your Pixel > Test Events. Enter your website URL and click ‘Open Website’. As you browse and take actions on your site, you will see events appear in real time in the Test Events panel.
This is more detailed than Pixel Helper — it shows the exact parameters each event is sending, which lets you verify that value, currency, and content_ids are all present and correctly formatted. Do this for every standard event you have configured before launching any campaign that optimises for those events.
Step 5: Verify Your Domain
Domain verification tells Meta that you are the legitimate owner of the website you are tracking. Without it, you cannot properly control how conversion events are configured for iOS users, and some advanced features are restricted.
- Go to Meta Business Manager > Business Settings > Brand Safety > Domains.
- Click ‘+ Add’ and enter your root domain (yourdomain.com — no www, no subdomains).
- Choose your verification method:
- DNS TXT record (recommended) — add the TXT record Meta provides to your domain’s DNS settings. Takes up to 72 hours to propagate.
- HTML file upload — download the HTML file Meta generates and upload it to your domain root.
- Meta tag — copy the meta tag into the <head> of your homepage.
- After adding the verification method, return to Events Manager and click ‘Verify Domain’. If DNS propagation hasn’t completed yet, wait and try again in a few hours.
Step 6: Set Up Conversions API (CAPI)
This is the step most advertisers skip. It is also the most important one in 2026 — the complete Conversions API setup guide covers every implementation method in full detail.
The Conversions API sends event data directly from your web server to Meta, bypassing the browser entirely. It is unaffected by ad blockers, Safari ITP, iOS privacy restrictions, or slow page loads that cut off before the Pixel fires. Running CAPI alongside your browser Pixel gives Meta a complete picture — the browser catches what it can, and the server fills in everything the browser misses.
Three Ways to Set Up CAPI
| Method | Who It’s For | Effort | Coverage |
| One-click Meta-enabled CAPI (NEW April 2026) | SMBs on standard platforms who want quick server-side coverage | 5 minutes — no code | Standard events from web conversions. Does not cover offline events or custom parameters. |
| Platform partner integration (Shopify, WooCommerce) | E-commerce businesses on major platforms | 15–30 minutes | Platform-standard events with strong parameter coverage. Best balance of speed and completeness. |
| Custom server-side implementation | Businesses needing offline events, CRM data, or custom logic | Developer required | Full control — any event, any parameter, including events from outside the website (phone calls, CRM stage changes, subscription renewals). |
One-Click CAPI (The Fastest Path for Most Businesses)
As of April 2026, Meta allows you to activate CAPI with a single click from Events Manager. Navigate to Events Manager > your Pixel > Overview tab. You will see an ‘Activate Conversions API’ button. Clicking it stands up server-side CAPI automatically — Meta handles the infrastructure, inherits your standard event configuration from the browser Pixel, and sets up deduplication automatically.
Limitations: one-click CAPI covers standard web events but does not support offline conversions, custom event parameters beyond standard fields, or advanced deduplication logic. If your business needs any of these, you need a partner or custom implementation.
Shopify CAPI Integration
- In Shopify Admin, go to your Meta & Facebook Sales Channel.
- Navigate to Settings > Data Sharing.
- Set Data Sharing to ‘Maximum’. This enables both Pixel and CAPI to send events with the richest possible first-party data — customer email, phone, name — which directly improves Event Match Quality.
- Verify in Events Manager that you are now seeing events from two sources for key events like Purchase — one browser (Pixel) and one server (CAPI). This is correct and expected.
Step 7: Set Up Deduplication (Critical If Running Both Pixel and CAPI)
This is where most Pixel + CAPI setups go wrong. When both your browser Pixel and server-side CAPI send a Purchase event for the same transaction, Meta receives two events. Without a matching identifier, Meta cannot tell they are the same event — so it counts two purchases instead of one.
The result: inflated conversion counts, overstated ROAS, and an algorithm optimising on fiction. Fixing deduplication is not optional.
How Deduplication Works
Meta deduplicates events using two matching fields: the event_name (e.g., ‘Purchase’) and the event_id — a unique identifier you attach to each event. If Meta receives two events with the same event_name and event_id within a short time window, it keeps one and discards the duplicate. If the event_id does not match, or if one side sends it and the other doesn’t, Meta counts two separate events.
The Golden Rule
Use the same order ID (or transaction ID) as the event_id on both your Pixel event and your CAPI event. This is your source of truth — the one identifier that is guaranteed to be identical on both the browser and server side.
Verifying Deduplication Is Working
- In Events Manager, click on a key event like ‘Purchase’.
- Click ‘View Details’.
- Look for the ‘Deduplication’ section — it shows what percentage of events were successfully deduplicated.
- Target: >90% deduplication rate for events where both Pixel and CAPI fire. Below 90% means your event_id implementation has a mismatch.
- Compare your Pixel-reported conversions to your actual order data. A healthy ratio is 0.95x to 1.05x. Below 0.95x indicates under-counting (events being lost). Above 1.05x indicates duplication — your deduplication setup needs attention.
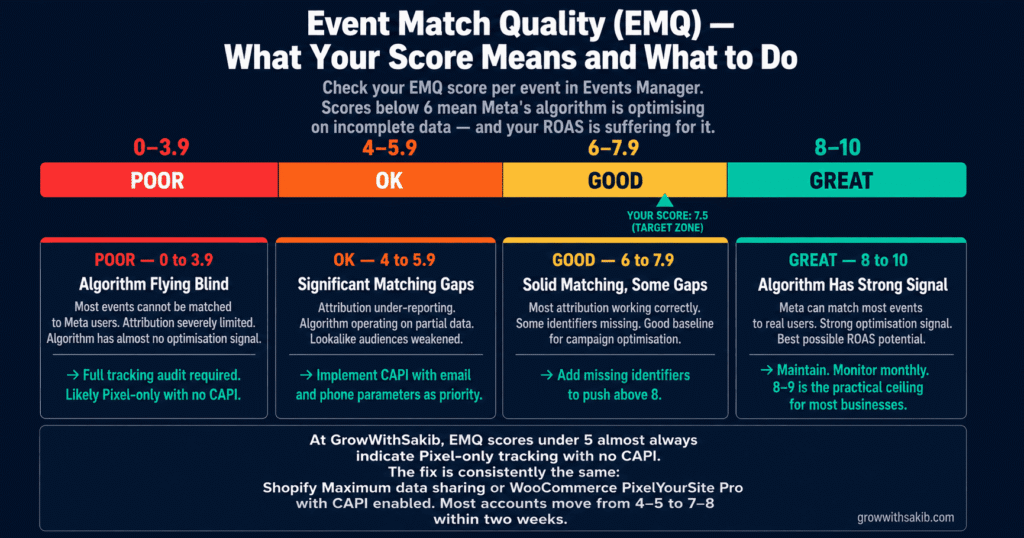
Step 8: Improve Your Event Match Quality Score
Event Match Quality (EMQ) is Meta’s score — from 0 to 10 — measuring how well it can match your tracked events to real user profiles in its system. A high EMQ score means Meta can attribute more of your conversions, build better audiences, and optimise more effectively. A low score means you are sending data that Meta cannot use.
| Score Range | Rating | What It Means | What to Do |
| 8–10 | Great | Meta can match most events to users. Algorithm has strong optimisation signals. | Maintain. Monitor monthly. |
| 6–7.9 | Good | Solid matching with some gaps. Most attribution working correctly. | Add missing identifiers to get above 8. |
| 4–5.9 | OK | Significant matching gaps. Attribution under-reporting, algorithm operating on partial data. | Implement CAPI with email and phone parameters as priority. |
| 0–3.9 | Poor | Most events cannot be matched. Algorithm essentially flying blind. | Full tracking audit required. Likely Pixel-only with no CAPI. |
How to Improve Your EMQ Score
EMQ improves by sending more and better customer identifiers with each event. The identifiers Meta uses, in order of impact:
- Hashed email address — highest impact identifier. If users are logged in or have entered their email (at checkout, for example), capture and pass this with every event. Must be sent as a SHA-256 lowercase hash.
- Hashed phone number — second highest impact. Pass in E.164 format (e.g., +447911123456), then hash.
- _fbp cookie — the browser identifier set by the Pixel. Already sent automatically when Pixel fires, but needs to be recovered and passed server-side with CAPI events too.
- _fbc cookie (click ID) — the ad click identifier. Like _fbp, it needs to be stored on your server and passed with CAPI events.
- External ID — your CRM or platform’s internal customer ID. Useful for identifying returning customers across sessions.
- First name, last name, city, postcode, country — lower individual impact but cumulative improvement. Pass all of them when available.
Step 9: Configure Aggregated Event Measurement for iOS Users
Aggregated Event Measurement (AEM) is Meta’s system for measuring conversions from iOS 14.5+ users who have opted out of tracking via Apple’s App Tracking Transparency (ATT) framework. AEM uses probabilistic modelling to attribute conversions to campaigns even when individual user data isn’t available.
AEM limits you to eight prioritised conversion events per domain. For iOS users who have opted out of tracking, Meta will only report conversions against the highest-priority event that occurred during their session. This makes event prioritisation a strategic decision — not an afterthought.
How to Prioritise Your Eight AEM Events
The correct priority order puts your highest-value conversion event at the top. When an iOS user completes multiple actions — views a product, adds to cart, and purchases — Meta reports only the event ranked highest in your priority list.
- Priority 01 – Event: Purchase – Rationale: Your primary conversion — always at the top for e-commerce
- Priority 02 – Event: Lead (or CompleteRegistration) – Rationale: Second-highest value action; primary for service businesses
- Priority 03 – Event: InitiateCheckout – Rationale: Signals strong purchase intent; valuable for retargeting
- Priority 04 – Event: AddToCart – Rationale: Upper-funnel purchase signal; builds high-intent audiences
- Priority 05 – Event: ViewContent – Rationale: Product interest signal; useful for retargeting
- Priority 06 – Event: Contact – Rationale: Engagement signal for service businesses
- Priority 07 – Event: Search – Rationale: Engagement signal; lower priority
- Priority 08 – Event: PageView – Rationale: Only include if you run traffic campaigns and need iOS data
To configure: go to Events Manager > your domain > Aggregated Event Measurement > Configure Web Events. Drag events into your preferred priority order and save — then return to the Meta Ads Guide to build campaigns on top of your properly configured tracking.
10-Point Meta Pixel Audit Checklist
Use this checklist on new setups before your first campaign, and on existing accounts every quarter. Each point takes 2–5 minutes to check.
- Pixel fires on all pages. Use Pixel Helper to confirm PageView on home page, product pages, category pages, and blog posts — not just the home page.
- All conversion events fire with correct parameters. In Events Manager Test Events, verify Purchase passes value, currency, and content_ids. Verify Lead passes content_name. Yellow warnings in Pixel Helper mean parameters are missing.
- CAPI is active alongside Pixel. Events Manager should show ‘Browser + Server’ sources for key conversion events. If only ‘Browser’ appears, CAPI is not configured.
- Deduplication is working. Check Purchase event Details > Deduplication — should show >90% deduplication rate. Conversion count should be within 5% of actual orders.
- Event Match Quality score is above 6. Below 6 means significant matching gaps. Check EMQ per event in Events Manager and identify which identifiers are missing.
- Domain is verified. Business Settings > Brand Safety > Domains should show your domain with a verified checkmark. Without this, iOS tracking is limited.
- Automatic Advanced Matching is enabled. Events Manager > your Pixel > Settings > Automatic Advanced Matching should be toggled on. This improves EMQ without code changes.
- Shopify data sharing is set to Maximum (Shopify stores only). Facebook & Instagram Sales Channel > Settings > Data Sharing. Changed from ‘Always on’ to ‘Optimised’ by default in January 2026 — check this explicitly.
- AEM event prioritisation is configured. Events Manager > Aggregated Event Measurement. Purchase should be Priority 1. Update priority list whenever you launch a new campaign type.
- Platform data cross-checked against Meta reporting. Compare your actual orders (Shopify/CRM) to Meta-reported conversions. A ratio above 1.1x (10% over-reporting) indicates deduplication issues. Below 0.9x (10% under-reporting) indicates tracking gaps — the same cross-channel verification mindset applies when tracking SEO results alongside your paid campaigns.
Common Pixel Mistakes (And How to Fix Them)
Pixel installed on homepage only
This is more common than you’d expect, especially on sites built with landing page tools or custom themes. If your Pixel only fires on the home page, Meta sees a tiny slice of your visitors — no product page views, no cart additions, no checkout starts. The retargeting audiences you build are thin and the algorithm has almost no optimisation signal. Fix: verify PageView fires on at least 5–6 different page types using Pixel Helper.
Purchase event firing on a third-party payment page
If your checkout redirects to Stripe Checkout, PayPal, or another hosted payment page, your Pixel cannot fire on that page — it’s on a different domain you don’t control. The purchase completes, but Meta never receives the Purchase event. Fix: configure Purchase tracking via your order confirmation page URL, or implement CAPI server-side where the event fires from your server after payment confirmation — regardless of which payment provider handled the transaction. This is especially important for local business Meta Ads campaigns where offline payment methods are common.
Double-firing events from multiple integrations
If you have both the native Shopify Meta channel AND a separate GTM implementation, both may fire the same Purchase event — without shared event_ids, Meta counts them as two separate purchases. Audit your active tracking sources in Events Manager. You should see exactly one implementation active per event, or multiple implementations with confirmed deduplication working correctly.
Pixel firing before user consent (GDPR)
In EU markets, firing the Pixel before obtaining consent violates GDPR and ePrivacy Directive requirements. If your consent management platform (CMP) is not correctly blocking the Pixel until consent is granted, you face legal risk — not just platform risk. Implement a proper CMP (Cookiebot, OneTrust, CookieYes) and verify that the Pixel does not load for users who have not yet consented. For CAPI events in EU markets, consult legal counsel on what data can be sent server-side and under which lawful basis.
Frequently Asked Questions
What is the difference between Meta Pixel and Conversions API?
Meta Pixel is browser-side JavaScript that tracks user actions client-side and sends them to Meta. Conversions API is a server-side connection that sends events directly from your web server to Meta, bypassing the browser. Pixel is easier to install; CAPI is more reliable because it is unaffected by ad blockers, Safari privacy features, and iOS restrictions. In 2026, you should run both — they are complementary, not alternatives.
Does Meta Pixel work after iOS 14?
The Pixel still works on iOS devices, but its data is significantly less complete than before iOS 14. Apple’s App Tracking Transparency (ATT) framework means many iOS users have opted out of tracking, and Safari’s Intelligent Tracking Prevention limits cookie lifetimes. For iOS users who have opted out, Meta relies on Aggregated Event Measurement (probabilistic modelling) rather than user-level data. The combination of Pixel + CAPI + domain verification + proper AEM configuration is the best available approach for recovering iOS signal.
How do I know if my Meta Pixel is working?
Use three tools: (1) Meta Pixel Helper Chrome extension — shows events firing in real time on your website with green/yellow/red status indicators. (2) Events Manager Test Events — shows detailed event data including parameters as you browse your site. (3) Events Manager main view — shows historical event volumes with any active errors in the Diagnostics tab. If all three show healthy data and your conversion counts roughly match your actual orders, your Pixel is working.
What is a good Event Match Quality score?
Meta labels scores from 0–10 as Poor (under 4), OK (4–5.9), Good (6–7.9), and Great (8+). Aim for 6+ as a minimum. Scores of 8+ are achievable with CAPI properly configured, Automatic Advanced Matching enabled, and customer email and phone numbers passed with conversion events. A score of 10 is extremely rare — 8–9 is the practical ceiling for most businesses and represents excellent tracking quality.
What is event deduplication and do I need it?
Deduplication prevents the same conversion from being counted twice when both Pixel and CAPI fire for the same event. Without it, Meta reports inflated conversion numbers. You need deduplication if — and only if — you are running both Pixel and CAPI. The mechanism is simple: pass the same unique event_id (typically your order ID) in both the browser Pixel event and the CAPI server event. Meta matches them on event_name + event_id and discards the duplicate.
Should I use one Pixel or multiple Pixels?
One Pixel per business, installed on all pages and domains. Multiple Pixels on the same site creates data fragmentation — your audience pools are smaller, your purchase history is split, and your lookalike quality suffers. The only valid reason for multiple Pixels is genuinely separate businesses with separate advertising accounts and separate customer bases. Multiple brands under one company should still generally use separate Pixels per brand.