Here is something Meta does not warn you about: you can spend 45 minutes trying to set up your first campaign and get nowhere — not because you did anything wrong, but because nobody told you what to do before you opened the platform.
Meta Business Manager (recently renamed Meta Business Portfolio, though most people still call it Business Manager) is the foundation your entire Meta advertising operation sits on. Set it up correctly and everything else — campaigns, targeting, pixel tracking, team collaboration — works the way it should. Skip the setup or rush through it, and you will hit confusing walls at exactly the wrong moments.
This guide gives you the complete setup process in the right order, including the pre-flight steps most tutorials skip and the mistakes that quietly cause problems weeks or months later.
What Is Meta Business Manager — and Why Does the Name Keep Changing?
Meta Business Manager is Meta’s centralised platform for managing everything your advertising operation needs: Facebook Pages, Instagram accounts, ad accounts, the Meta Pixel, product catalogues, and team access — all under one login, separate from your personal Facebook profile.
In 2024, Meta officially rebranded Business Manager as Meta Business Portfolio. The functionality did not change — only the name. If you log into business.facebook.com right now, you will see ‘Business Portfolio’ in the settings. But across tutorials, support docs, and the advertising world generally, both names are used for the same thing. This guide uses them interchangeably so you recognise either when you encounter them.
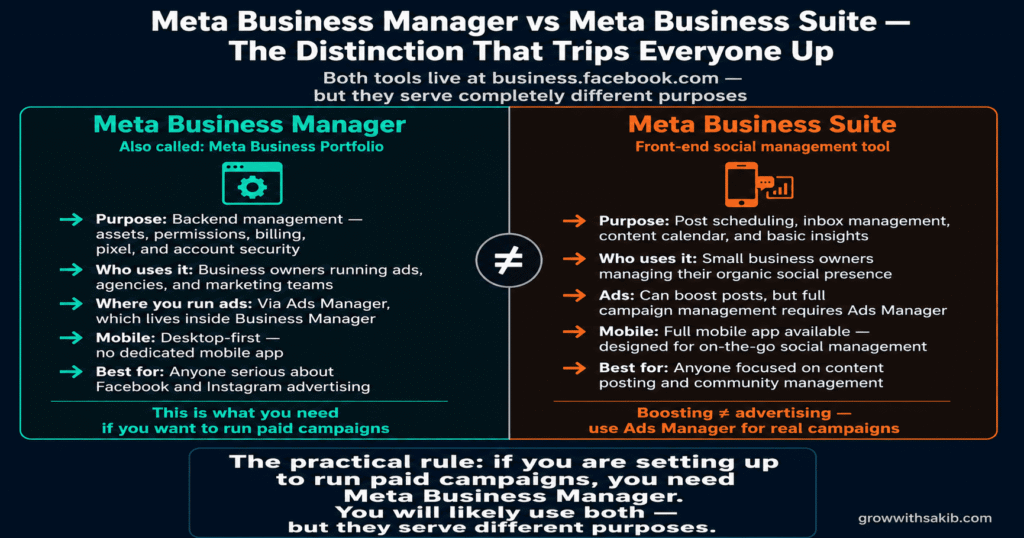
Meta Business Manager vs Meta Business Suite — the distinction that trips everyone up
These are two different tools that share a URL and confuse almost every beginner. Here is the clearest possible distinction:
| Meta Business Manager (Business Portfolio) | Meta Business Suite |
| Purpose: Backend management — assets, permissions, ad accounts, billing, pixel, security | Front-end management — post scheduling, inbox, content calendar, basic insights |
| Who uses it: Business owners running ads, agencies, marketing teams | Small business owners managing organic social presence |
| Where you run ads: Via Ads Manager, which lives inside Business Manager | Can boost posts, but full campaign management requires Ads Manager |
| Mobile app: Desktop-first (no dedicated mobile app) | Full mobile app available |
| Best for: Anyone serious about Facebook and Instagram advertising | Anyone focused on content posting and community management |
The practical rule: if you are setting up to run paid campaigns, you need Meta Business Manager. Meta Business Suite is for managing your social presence. You will likely use both, but they serve different purposes.
Before You Begin: The Pre-Setup Checklist
Most Meta Business Manager tutorials jump straight into the setup steps. That is exactly why so many people hit errors halfway through. Meta has a set of requirements that need to be in place before you start, and failing to meet them causes cryptic error messages that are hard to debug after the fact.
Go through this checklist before you open business.facebook.com.
1. Your personal Facebook profile — the foundation everything builds on
This surprises some people, but Meta Business Manager must be created using a personal Facebook account — not a business account, not a newly created profile made just for this purpose. Meta uses your personal profile to verify there is a real person behind the business.
- Use your real name. Meta may ask you to verify your identity with a government ID if unusual activity is detected. Fantasy names, initials, or business names in your personal profile will cause verification failures.
- Enable two-factor authentication (2FA) first. This is now effectively mandatory. Go to Facebook Settings > Security and Login > Two-Factor Authentication and set this up before doing anything else. Meta requires all Business Manager admins to have 2FA enabled.
- Only one personal profile per person. If your primary profile is blocked and you create a second one, Meta can identify you via device and IP and block that one too. If your original profile is blocked, work through Meta’s official appeals process.
- Allow personalised advertising. Go to Account Settings > Ad Preferences and confirm you have opted in to personalised ads. Meta requires this of anyone who wants to show personalised ads to others.
- Add your business email to your Facebook profile. This has become mandatory for business verification. Personal email domains (Gmail, Yahoo, Outlook) are acceptable for the profile but not as your primary business contact email in Business Manager itself.
2. Your business email address
When you set up Business Manager, you will be asked for a business email address separate from your personal Facebook email. This needs to be a professional domain — yourname@yourbusiness.com — rather than a personal Gmail or Outlook address.
If you do not have a business email yet, set one up through Google Workspace, Microsoft 365, or your web hosting provider before continuing. This email is where Meta sends account notifications, billing alerts, and security warnings — you need reliable access to it.
3. Your payment method
Meta’s payment methods are linked at the ad account level, not the Business Manager level. But you should have a credit card or debit card ready to add during setup. A few things to know upfront:
- Payment blocks are permanent and platform-wide. If a payment method fails repeatedly, Meta blocks it across all Business Managers — not just yours. You cannot use a blocked card in a new Business Manager. If this happens, you need to contact Meta Support to resolve it.
- Prepaid cards are often rejected. Meta prefers standard credit or debit cards tied to bank accounts. Prepaid or virtual cards frequently trigger payment failures.
4. Your Facebook Page and Instagram account
You need at least one Facebook Page (not a personal profile) to run ads — and if you are also investing in organic search alongside paid, your SEO for small business strategy works best when both channels are active simultaneously. If you do not have one, you can create it during setup. Your Instagram account should be a professional account (Business or Creator), not a personal one. If it is currently personal, convert it via Instagram Settings > Account > Switch to Professional Account before connecting it.
How to Set Up Meta Business Manager: Step-by-Step
With your checklist complete, the actual setup takes 20–35 minutes. Follow these steps in order.
01. Create Your Business Manager Account
Go to business.facebook.com and click ‘Create Account’ in the top right corner.
Log in with your personal Facebook credentials when prompted.
Enter your business name. Use your exact legal business name — mismatched names between Business Manager and your payment details cause verification delays later.
Enter your business email address (your professional domain email, not your personal one).
Click ‘Submit’. Meta will send a verification email — confirm it within 24 hours or the account activation will fail.
02. Complete Your Business Information
Once inside, go to Business Settings (gear icon in the top left or via the sidebar).
Under ‘Business Info’, fill in your business address, phone number, and website URL.
Select your business category and set your time zone. Your time zone affects how ad scheduling and performance reporting display — it cannot be changed easily later.
Upload your business logo (minimum 400×400px). This appears in your ad account and helps with business verification.
Save your changes.
03. Create Your Ad Account
Navigate to Business Settings > Accounts > Ad Accounts.
Click ‘+ Add’ and select ‘Create a New Ad Account’.
Give it a clear, descriptive name — something like ‘Main Ads Account’ or ‘Brand Name — Advertising’.
Set your currency and time zone. This is the most critical step in the entire setup. Currency and time zone cannot be changed after an ad account is created. If you get this wrong, you will need to create an entirely new ad account and lose any historical performance data.
Add a payment method to your ad account. Without a valid payment method, your ad account has limited functionality and cannot run campaigns.
04. Connect Your Facebook Page
Go to Business Settings > Accounts > Pages.
Click ‘+ Add’ and choose one of three options:
- ‘Add a Page’ — to add a page you already own and administer
- ‘Request Access to a Page’ — to request access to a page owned by someone else (for agencies)
- ‘Create a New Page’ — to create a brand-new Facebook Page
If you are adding an existing page, search for it by name or URL and confirm the connection.
Assign appropriate roles to team members who need access to this Page.
05. Connect Your Instagram Account
Go to Business Settings > Accounts > Instagram Accounts.
Click ‘+ Add’ and log into your Instagram professional account when prompted.
Confirm the connection. Instagram must be a Business or Creator account — personal profiles cannot be connected.
If your Instagram is not yet connected to a Facebook Page, Meta will prompt you to complete this link during the connection process.
06. Set Up Your Meta Pixel
Navigate to Business Settings > Data Sources > Datasets — for the complete Meta Pixel setup process including event configuration and testing, see the dedicated guide.
Click ‘+ Add’ and name your Pixel clearly — typically your business name followed by ‘Pixel’.
Enter your website URL.
Choose your installation method:
- Partner integration (Shopify, WordPress/WooCommerce, Squarespace) — easiest for most businesses
- Manual installation — add the base code to the <head> section of every page
- Via Google Tag Manager — best if you already use GTM
After installation, use the Meta Pixel Helper Chrome extension to verify the Pixel is firing correctly on your site.
In Events Manager, use the ‘Test Events’ tool to confirm your conversion events (Purchase, Lead, etc.) are being received.
07. Verify Your Domain
This step became essential after iOS 14 and is required to unlock full conversion tracking. Without it, some conversion events may not report correctly.
Go to Business Settings > Brand Safety > Domains.
Click ‘+ Add’ and enter your website’s root domain (yourdomain.com — no www or subdomains).
Choose your verification method:
- DNS verification — add a TXT record to your domain’s DNS settings (recommended, most reliable)
- HTML file verification — upload a file Meta provides to your web server
- Meta tag verification — add a meta tag to your website’s <head>
After completing verification in your DNS or website, click ‘Verify Domain’ in Meta.
It can take up to 72 hours for DNS changes to propagate — do not panic if verification does not confirm immediately.
08. Set Up Business Verification
Business verification unlocks higher spending limits, access to advanced features, and increases account trust signals.
Go to Business Settings > Security Centre.
Click ‘Start Verification’ under Business Verification.
Select your business type and provide the requested documentation — typically one of: business license, tax registration document, or articles of incorporation.
Enter your business information exactly as it appears on your documents — name, address, phone number must match precisely.
Submit and wait. Verification typically takes 1–3 business days but can extend to 2 weeks if:
- Your business name does not exactly match your documents
- You are in a regulated industry (finance, health, political advertising)
- Your domain is newly registered
- Your business address is in a region Meta scrutinises more closely
09. Configure Team Permissions
Go to Business Settings > Users > People.
Click ‘+ Add’ and enter each team member’s email address.
Assign their Business Manager role:
- Admin — full access including billing, user management, and all assets
- Employee — access only to assets explicitly assigned to them
Then assign asset-specific permissions. For each ad account, go to Business Settings > Accounts > Ad Accounts and assign:
- Admin — can create campaigns, modify budgets, manage billing and other users
- Advertiser — can create and edit campaigns, view performance; cannot access billing
- Analyst — view-only access to reports; cannot make changes
For agencies: add the agency via Business Settings > Partners, not as an employee.
Setting Up Meta Business Manager as an Agency
If you manage advertising for clients, your Business Manager setup has some important differences from a standard business setup.
The golden rule: never run client campaigns from your own ad account
Every client needs their own ad account inside their own Business Manager. Their ad account, their Page, their Pixel — all owned by them. You access their assets through a Partner relationship, not by housing their campaigns inside your accounts.
This matters for three reasons. First, billing: clients are charged against their ad account, not yours. Second, ownership: if you and a client part ways, they retain everything. Third, compliance: Meta’s policies require advertisers to clearly represent who they are — commingling client assets in your accounts creates policy risk.
The correct agency access workflow
- Your client creates (or already has) their own Meta Business Manager.
- They go to Business Settings > Users > Partners and add your Business Manager’s Partner ID.
- You accept the partner request in your own Business Settings.
- Your client assigns you the specific asset permissions you need — typically Advertiser on their ad account and Editor on their Page.
- You now access their assets from within your own Business Manager, without ever logging into their personal Facebook account.
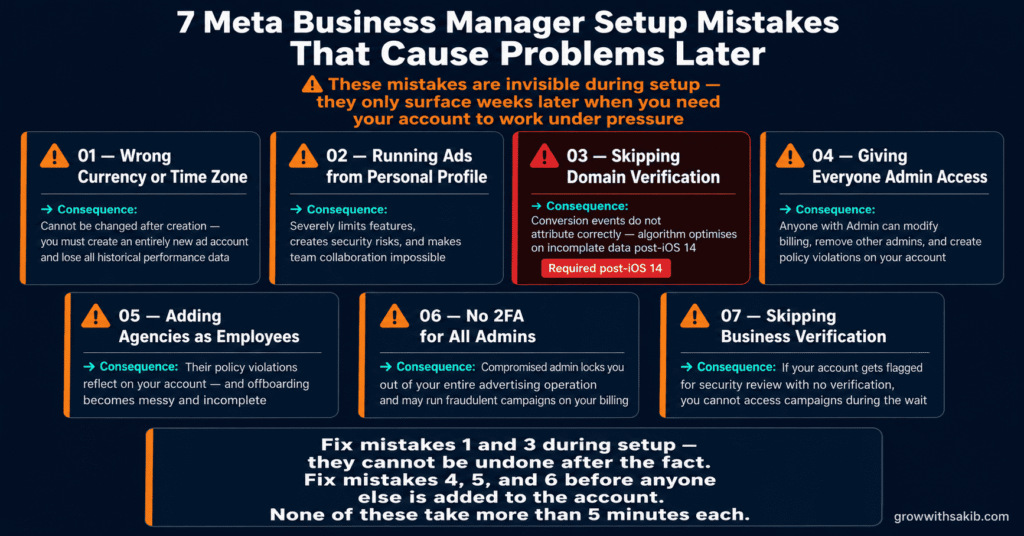
The 7 Setup Mistakes That Cause Problems Later
These are the mistakes we see most often when auditing new accounts at GrowWithSakib. Most are invisible during setup but create real problems once you start running campaigns.
Mistake 1: Setting the wrong currency or time zone on your ad account
This cannot be changed after creation. If your ad account is set to USD but you operate in GBP, your billing, reporting, and budget settings will always be misaligned — the same precision matters when tracking results across your marketing channels. If you realise this has happened, create a new ad account with the correct settings. Your old account’s historical data stays on the old account — it does not migrate.
Mistake 2: Running ads directly from a personal Facebook profile
It is technically possible to create a basic ad account without Business Manager — but it severely limits your access to features, creates security risks, and makes team collaboration impossible. If you have been running ads this way, migrate to Business Manager as soon as possible. Go to business.facebook.com, create your Business Manager, and move your existing ad account under it.
Mistake 3: Skipping domain verification
After iOS 14, domain verification is required for accurate conversion tracking. Without it, some conversion events will not attribute correctly to your campaigns, which causes the algorithm to optimise on incomplete data. Verification takes 10 minutes and should be done before your Pixel goes live.
Mistake 4: Giving everyone Admin access
Too many admins is a security risk and a billing risk. Anyone with Admin access can modify spending limits, add payment methods, and — in a worst case — remove other admins. Limit Admin access to the business owner and one trusted backup. Marketing managers need Advertiser access. Executives reviewing reports need Analyst access. Match the permission to the actual need.
Mistake 5: Adding agencies as employees instead of partners
When you add an external agency as an employee in your Business Manager, you are giving them access with your business identity. If they cause a policy violation, it reflects on your account. Partner access keeps their actions cleanly attributed to them and makes offboarding straightforward — remove partner access, and they lose access to everything, immediately.
Mistake 6: Not setting up 2FA for all admins
Account compromise almost always starts with an admin account that did not have two-factor authentication enabled. A compromised admin can lock you out of your entire advertising operation, run fraudulent campaigns on your billing, and create policy violations that result in your Meta Ads account being disabled permanently. Require 2FA for all admin users — not just yourself.
Mistake 7: Skipping business verification until you need it
Business verification takes 1–14 days. If your account gets flagged for a security review and you have not been verified, you cannot access your campaigns while verification completes. Start it during setup so it is done before it matters.
After Setup: What to Do First
With Business Manager configured, here is the order in which to proceed before launching your first campaign.
- Confirm your Pixel is firing on all pages using the Meta Pixel Helper extension.
- Use Events Manager > Test Events to verify your key conversion events are registering correctly.
- Complete business verification if you have not already.
- Review your ad account’s Account Quality (Ads Manager > All Tools > Account Quality) to confirm there are no existing policy flags — especially important if you plan to run Meta Ads for local business campaigns where location targeting requires clean account setup.
- Set up the Conversions API alongside your Pixel if you have developer resources available — this significantly improves Meta Ads attribution accuracy, particularly for iOS users.
- Return to the Meta Ads Guide to understand campaign structure before building your first campaign.
Frequently Asked Questions
Do I need a Facebook personal account to set up Meta Business Manager?
Yes. Meta requires Business Manager to be created and administered by a real personal Facebook account. This is how Meta verifies there is a legitimate person behind the business. You can add other administrators later, but the initial setup must go through a personal profile.
How many Meta Business Managers can one person create?
Each personal Facebook account can create a maximum of two Business Managers. If you need more — for example, if you manage multiple separate businesses — you will need additional Facebook accounts held by other people, or you can request an increase through Meta Business Support (though this is rarely approved without a strong business justification).
What is the difference between Meta Business Manager and Meta Business Portfolio?
They are the same product under two names. In 2024, Meta rebranded Business Manager as Business Portfolio. The functionality, URL (business.facebook.com), and interface are all the same. You will see both terms used in Meta’s own documentation, support articles, and tutorials — they refer to identical tools.
Can I add an Instagram account without a Facebook Page?
You can connect an Instagram account to Business Manager without immediately linking it to a specific Facebook Page. However, to run most types of Instagram ads, a linked Facebook Page is required. Meta’s ad delivery systems use the Page as the advertiser identity. Connect both during setup to avoid this limitation blocking your first campaign.
How long does Meta business verification take?
Typically 1–3 business days for straightforward applications. It can extend to 2 weeks if your business name does not exactly match your documents, you are in a regulated industry, your domain was recently registered, or Meta requires additional documentation. To avoid delays: submit your documents in English where possible, use your exact legal business name, and ensure your business address matches your documentation precisely.
What happens if my payment method gets blocked?
Payment method blocks are tied to the specific card or bank account, not to your Business Manager. A blocked payment method cannot be used in any Business Manager, even a new one. To resolve it, you need to contact Meta Business Support directly. Do not attempt to create a new Business Manager as a workaround — it will not solve the payment block and may create additional account issues.
Why can’t I find Meta Business Manager — I only see Meta Business Suite?
Both tools are accessed through the same URL (business.facebook.com), and depending on your account type and history, Meta may default you to Business Suite. To access Business Manager settings, look for the gear icon (Settings) in the sidebar of Business Suite — this takes you into Business Manager’s configuration area. The two tools are layered on top of each other at the same URL.